

Here is quick post describing how to connect to Box.net (box.com now) using an application called NetDrive. This is the process I used for Windows XP, though it should work for Windows 7 as well. You can download the application from here: http://netdrive.net/
Of course it goes without saying that you need to sign up for a Box.net account if you don't already have one. You can sign up for an account here: http://box.com
There are a few tutorials on connecting your Box.net account as a drive in Windows. Here are some examples:
http://techie-buzz.com/tech-news/mount-boxnet-account-in-windows-explorer.html
http://smallvoid.com/article/winnt-webdav-network-drive.html
I have had trouble trying to use the Windows WebDav implementation on XP, so this application was a breath of fresh air. It is very straightforward, though there is a gotcha that I haven't seen documented on any other site. So here are the steps:

- Download and install NetDrive
- Open the application
- Create a "New Folder" under Site
- Select your new folder
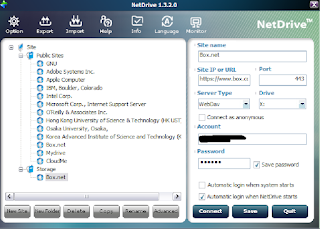
- Click "New Site" and fill in the information on the right side of the screen
- I named mine "Box.net" (I know, not very original)
- For the site URL, use: "https://www.box.com/dav" (notice the https prefix, and the .com instead of .net)
- Enter port 443
- Select "Server Type" as "WebDav"
- Choose a drive letter for your mount point
- Enter your "Account" login ID
- Enter your "Password" using your Box.net password
- Select your "Automatic login..." preferences
- Click "Save"

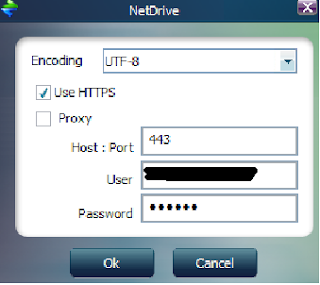
- Select the "Site" you just created
- Click on the "Advanced" button
- Set your "Encoding" to UTF-8
- Click the "Use HTTPS" checkbox
- Enter 443 for the "Host : Port" (if it's not already filled in)
- Enter your login information again (if it's not already filled in)