PureVPN Banner

PureVPN

Products You Can Use!

Use Filmora video editor to express your creativity and amaze with beautiful results.

Walmart Tech

Wal-Mart.com USA, LLC

Search This Blog

Friday, December 21, 2012

Tips and Recommendations for Resizing Windows Partitions

A friend recently asked me how to go about resizing some partitions in Windows 7. He wanted to know how to do it with Windows Disk Management. I included a link in this post to a How-To for that. Of course, Windows built-in tools are not always the best or most functional for performing certain tasks. Therefore, I wrote the following to help him choose some free third-party tools to accomplish the job.

icon icon

Paragon makes some good tools and has free versions. You can use "Backup and Recovery 2012" to make an image of your hard disks for backup purposes. Then use "Partition Manager" to resize your partitions.

http://www.paragon-software.com/free/

"Macrium Reflect" is what I usually use to clone my hard drives similar to "Backup and Recovery 2012" above.

http://www.macrium.com/reflectfree.aspx

Built-in Windows support for resizing partitions exists in Vista and 7. Use another product to back up your partitions first just to make sure.

http://www.howtogeek.com/howto/windows-vista/resize-a-partition-for-free-in-windows-vista/

"Gnome Partition Manager Live" is a bootable CD that you can use to resize, create and move partitions as well. I often use this bootable disk to adjust partition size, or repartition hard drives.

http://gparted.sourceforge.net/livecd.php

Whatever you choose, you should do a thorough disk defragmentation before resizing. If personal data or system files are occupying non-contiguous space, it will prevent you from resizing past that file fragment.  To do a thorough defrag, choose one of the below programs, defrag with free space consolidation if possible, then tell it to do a boot-time defrag, then reboot. When the system is coming back up, it will defrag before the operating system has time to lock system files. Two that I highly recommend are Auslogics and Smart Defrag 2.

http://www.auslogics.com/en/software/disk-defrag/

http://www.iobit.com/iobitsmartdefrag.html

Just pay attention when you install any of these programs, as many reputable, good companies will offer to install additional software like toolbars and such as you are going through the installation. You don't have to worry about it with the Gnome Partition Editor since it's open source, but most of the other companies probably include those things in the installer. You should be able to opt-out.

Good luck. Have fun. If you made a backup like I suggested, you have nothing to fear.

Tuesday, August 7, 2012

CDE Released As Open Source

For those of us who have been around UNIX and UNIX-Like systems for a while this news comes as a big surprise! The Common Desktop Environment (CDE) has been a UNIX only staple for quite a long time now. It is one of those things you either love or hate. I personally have a fondness for it and have always hoped I could run it on Linux one day.

The CDE was a joint effort of several big UNIX players including IBM, HP, and Sun. Their goal was to create a unified face for UNIX to compete with the growing threat of Windows. Before establishing the Open Group, each company had their own spin on the UNIX desktop, which made the operating system look fractured. By standardizing on a certain interface and it's associate toolkit, Motif, they were able to ensure user familiarity regardless of the underlying version of UNIX. 

For me, the news broke on OSNews yesterday. I immediately downloaded the sources and built the software. Presently, the sources build pretty cleanly on Debian Squeeze (6.0 stable), and Ubuntu. I built it on Bodhi Linux v1.4.0 which is based on Ubuntu 10.04. I followed the instructions for building posted on the CDE Sourceforge wiki here. The build went smoothly and didn't require any intervention from me once I added all the development packages required.

What I got was a mostly working CDE. By mostly working, I mean this is alpha quality at the moment, and some of the applications that come with the CDE did not work. For example, the dtmail application does not work. Also, the version of vi installed in Ubuntu didn't recognize the termcap used in dtterm.

One thing I was very pleased with is that when CDE windows are opened, they aren't too big for the screen on my little netbook. It is sad that so many other applications and desktop environments still can't determine the size their windows should be for a smaller screen.

With all the eye candy that desktop environments feel compelled to throw in nowadays, CDE appears rather homely. The beauty of this homeliness though is the performance. It is very responsive - downright snappy! Sure, there is not glitz and glamour, but I am willing to make that sacrifice for usefulness.

Note: Image courtesy of the Wikipedia entry on the Common Desktop Environment


CDE is all about consistency and stability. It uses a bygone set of design principals that are by and large ignored today. It's design is utilitarian. The interface is very consistent in it's presentation. In short, it does what you expect it to do in any given function.

So why did the Open Group decide to release it now? I don't really care, though I wish they could have done it a long time ago. It has not really received any love in a decade. The good thing about waiting is that the CDE hasn't been cluttered up with constantly changing glamour libraries or tied to KDE/QT/GTK/Gnome.

What I would like to see is all the DT applications working, with perhaps the backends upgraded to support current API's. In other words I'd like to be able to use the DT calendar and mail apps with Google services. I also noticed that the dtterm termcap was not liked by vi on Ubuntu 10.10.

 Another useful feature would be a native looking system tray, since so many applications use them and nearly every window manager and desktop provides that functionality. Better yet, have dockable apps just create a desktop icon like minimized programs do. I temporarily installed stalonetray so I could access the NetworkManager applet to connect to wifi.

Thanks, Open Group. Looking forward to the release of Motif as well. Speaking of which, check out this Motify GUI from the Wayback Machine: http://www.breadbox.com/geoscreens/motif.gif

Ah, the good old days ...

Thursday, April 12, 2012

Barnes and Noble Simple Touch™ with GlowLight™

Hey, Barnes and Nobles has a new NOOK! The Nook Simple Touch™ with GlowLight™ is faster than other eReaders, can be read in bright sunlight, and lasts up to 1 month with the GlowLight™ on, or 2 months with a single charge if you don't use the Light. I am really kinda torn between getting an eReader like this or a full-on tablet.


New! NOOK Simple Touch™ by Barnes & Noble with Glowlight™. Read With The Lights On Or Off only at $139 – ships free!


Wonder how hackable the GlowLight™ is. Anyone have experience with it's sibling - the regular Simple Touch™? Can it be made to run Android Apps?

Let me know what you think of this device. How do you think it compares to other eReaders?

Tuesday, April 10, 2012

Connecting to Box.net With NetDrive

Here is quick post describing how to connect to Box.net (box.com now) using an application called NetDrive. This is the process I used for Windows XP, though it should work for Windows 7 as well. You can download the application from here: http://netdrive.net/

Of course it goes without saying that you need to sign up for a Box.net account if you don't already have one. You can sign up for an account here: http://box.com

There are a few tutorials on connecting your Box.net account as a drive in Windows. Here are some examples:

http://techie-buzz.com/tech-news/mount-boxnet-account-in-windows-explorer.html

http://smallvoid.com/article/winnt-webdav-network-drive.html

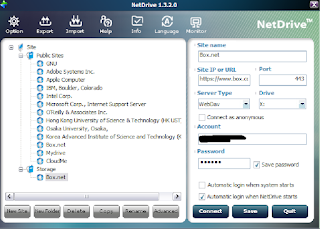
I have had trouble trying to use the Windows WebDav implementation on XP, so this application was a breath of fresh air. It is very straightforward, though there is a gotcha that I haven't seen documented on any other site. So here are the steps:


  1. Download and install NetDrive
  2. Open the application
  3. Create a "New Folder" under Site
  4. Select your new folder
  5. Click "New Site" and fill in the information on the right side of the screen
  6. I named mine "Box.net" (I know, not very original)
  7. For the site URL, use: "https://www.box.com/dav" (notice the https prefix, and the .com instead of .net)
  8. Enter port 443
  9. Select "Server Type" as "WebDav"
  10. Choose a drive letter for your mount point
  11. Enter your "Account" login ID
  12. Enter your "Password" using your Box.net password
  13. Select your "Automatic login..." preferences
  14. Click "Save"
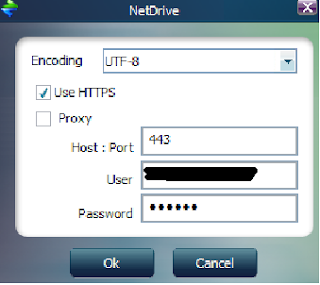
Now you are almost done. Here is the secret sauce that makes this work:

  1. Select the "Site" you just created
  2. Click on the "Advanced" button
  3. Set your "Encoding" to UTF-8
  4. Click the "Use HTTPS" checkbox
  5. Enter 443 for the "Host : Port" (if it's not already filled in)
  6. Enter your login information again (if it's not already filled in)
That is it! Now you can mount your Box.net cloud drive whenever you like. I find the performance better than other methods as well (ie - I set it up using Windows 7 native WebDav - WebFolders - support). You can now access your cloud drive any time you like.

Saturday, October 29, 2011

Google Buzz - Google Buzz is going away, but your posts are yours to keep

Google Buzz - Google Buzz is going away, but your posts are yours to keep

The end of yet another Google product. It was a good social app, but never really found it's niche. Hope G+ integrates some of it's features. Live long and prosper G+!

iolo System Mechanic

iolo technologies, LLC